Why Knitters Need Stretches and Exercises
We may joke about the horror of sleeve island or the repulsiveness of weaving in ends on colorwork, but a knitter’s true nightmare is far worse: not being able to knit. If you’ve ever felt a twang in your wrist or arm, then this fear has probably crept into your brain. How could you ever watch Netflix and just, like, not… knit? And while this may remain just a fear for some, it has unfortunately become a reality for others, including myself. Repetitive motion injuries (RMIs) are painful, physically as well as mentally. However, they can be prevented. Keep reading to learn all of the tips and tricks I figured out while recovering from my own RMI so you can keep on knitting.
What is a repetitive motion injury?
Repetitive motion injuries (RMIs), or Repetitive Strain Injuries (RSIs), are injuries to ligaments, muscles, nerves, and/or tendons caused by repeating the same motion. For knitters, these injuries often occur in the wrists and forearms and take the form of tendonitis, carpal tunnel, or radial tunnel. Often, they are temporary and can be healed with time and care. However, sometimes they require surgery to be fixed, and sometimes they are permanent.
About My RMI
I have had a knitting project going since I was 10 years old. However, I really dove into knitting in 2020 when I got the idea of creating New Wave Knitting. I ended up knitting way too much and not taking healthy breaks or stretches, and I ended up with an RMI.
At first, I did a little research and found that some people were able to rest for two weeks and then get going again. So I took two weeks off, but my forearm was still incredibly sore when I picked up the needles again. I ended up going to an orthopedic doctor, and they immediately diagnosed me with radial tunnel.I ended up having to wear a splint on my arm for three months, and I couldn’t knit for four months. After the four months were up, I was able to gradually begin knitting again, starting with 10 minutes a day. Y’all. 10 minutes a day!! As we all know, 10 minutes is nothing in the slow fashion world of knitting, but it was better than zero minutes.
This whole experience was incredibly painful for me, both physically and mentally. Knitting is a therapeutic practice for me, and I often knit as a way to destress, wind down, and relax. (Learn about the amazing impact that knitting has on anxiety.) Not being able to knit for months was incredibly difficult, and I do not want it to happen to you. If you want to avoid months of pain and too many dollars in doctor’s bills, then follow the tips below.Preventative Exercises for Knitters
The good news is that you can prevent hand pain with some simple stretches and exercises for knitters.
Mix Things Up
One way to prevent getting an RMI is to mix up your knitting needle sizes, yarn weights, and stitch patterns. All of these factors change the way your muscles and tendons are interacting just enough to keep your motions from being too repetitive. You could try this method out by having a few different projects going at one time that offer some variety.
When looking into how to prevent an RMI, I also read that a lot of knitters recommend trying different knitting techniques, such as English and Continental. If you feel motivated to try this method out, all the power to you. I tried this out myself when I was first starting to feel sore. However, as someone who has been an English knitter for 16 years, it felt impossible to work against years of muscle memory. But again, if you’re interested, give it a shot! Just don’t try knitting with different techniques within the same project because it can mess with the tension.Stretch Before and During Knitting
One of my favorite things to do is to compare knitting to professional sports. So, just like you stretch before a marathon, you also stretch before a knit and Harry Potter movie marathon. And during! It’s important to take a little break about every 30 minutes or so and do these stretches on both hands. Hold the stretches for about 5 seconds and repeat at least twice for good measure.
NOTE: Please be gentle and slow with these stretches! You don’t want to hurt yourself.Wrist Flexors
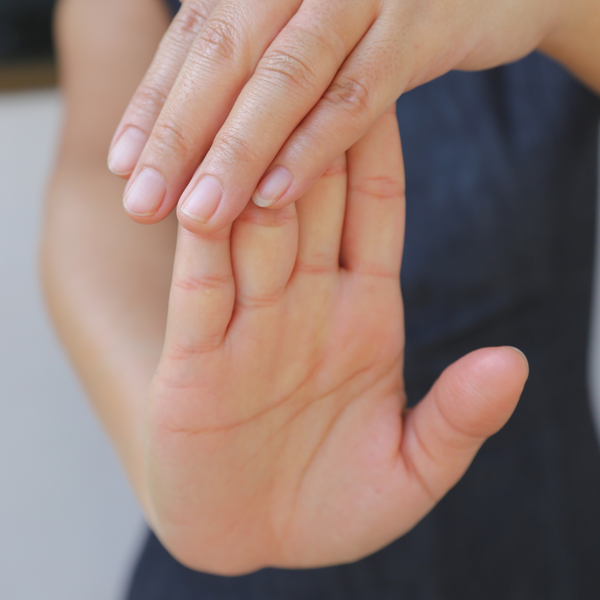
Stretch one arm out straight with your forearm facing up. Angle your hand downward. Use the other hand to pull your fingers toward your body. This stretches the muscles on the bottom of your forearm.
Wrist Extensors
Wrist extensors stretches the muscles on the top of your forearm, and I have two stretches for you. The first wrist extensor stretch involves putting your arm straight out, then angling your hand downward. Use your other hand to pull your downward-facing hand toward your body.
The second wrist extensor stretch involves stretching both arms out straight and putting both of your hands into soft fists. Slowly turn your fists downward, and then gently rotate them outwards to the top of your hands face one another.
Finkelstein Stretch
Stretch both arms straight with your palms facing one another. Fold your thumbs into your palms and gently wrap your fingers around your thumbs. Gently turn your fists downward. This stretches your wrist and thumb.
Radial Nerve Glides
Stand comfortably with your arms at your side. Drop one shoulder down while reaching the hand on that same arm downward (your hand can stay in a cupped/relaxed position, or you can make a fist). Gently tilt your head away from the side you are stretching. Keep your arm straight as you raise it up/backward while keeping the rest of your body still. This stretches the top of your forearm.
Strengthening Exercises for Knitters
Stretching is great — but strengthening is what builds endurance and resilience.
Why Strength Training Helps
Doing these exercises once a day can help support the muscles, ligaments, and tendons you rely on every stitch you make. If you’re just starting, aim for 10 slow reps per exercise and adjust based on comfort.
To really get ahead of RMIs is to strengthen the muscles, tendons, and ligaments in your wrists and arms. I suggest purchasing a set of resistant bands that have varying levels of resistance so that you can continue to build up strength. I recommend this set of resistance bands! (Please note that this is an affiliate link. If you make a purchase after clicking this link, I'll earn some yarn money.)
With the resistance bands, do the following exercises once a day. Aim for 10 reps per exercise. If you notice soreness at first, maybe try out once every other day for a while.Resisted Wrist Extension
While in a seated position with your knees bent at a 90-degree angle, place one end of the resistance band under your foot. Grab the other end in your hand and place your forearm face down on the corresponding leg, with your hand just over your knee. Bend your wrist upward and downward.
Resisted Wrist Flexion
Do the same as you did for the Resisted Wrist Extension, except place your forearm face up on your leg. Bend your wrist upward and downward.
Resisted Forearm Supination
Get in the same position as you did for the wrist extension with your forearm facing down. Rotate your fist upward.
Resisted Forearm Pronation
Get in the same position as you did for the Resisted Wrist Flexion, but with the resistance band going along the outside of your hand. Rotate your fist down as far as possible.
Resisted Ulnar Deviation
Hold the tubing in one hand and hold it at your hip. Hold the other end of the tubing in your other hand, which is resting at the opposite knee. Bend your wrist out to the side as far as possible while keeping your forearm still on your leg.
Resisted Radial Deviation
Okay, I honestly can’t remember or find the name to this strengthening exercise, but it does help with strengthening your wrists. Place your forearm along your leg and position your hand as if to shake someone else’s hand. Grip the resistance band within your hand, and move your wrist up and down while keeping your arm in place.
When Stretches Aren’t Quite Cutting It
If you’re doing all the “right things” — taking breaks, stretching, maybe even adding in some strengthening — and your hands are still feeling cranky after knitting, you’re not imagining it. Sometimes our bodies just need a little more support.
That’s why I want to share Hands of a Maker, a wellness course created specifically for people who make with their hands (knitters included). It was developed by a fellow maker with a background in Massage Therapy and Movement, and it’s all about learning how to care for your hands, wrists, and forearms in a way that’s actually sustainable.
What I really appreciate about this course is that it goes deeper than quick fixes. It helps you understand what’s going on in your body and gives you tools you can realistically work into your day — so making doesn’t have to come with constant soreness or worry about long-term damage.
✨ As a little bonus, because you’re being referred by another maker, you’ll get 10% off the course at checkout.
You can learn more about Hands of a Maker and get the discount here: Hands of a Maker: Wellness Course for Creatives
How to Treat an RMI
If you are already feeling the pain of an RMI, then I have two big pieces of advice:
- Rest
- Go to the doctor
While getting a doctor involved is costly, it was super important for me. Before going, I thought I had carpal tunnel and bought a wrist split off of Amazon. However, I had radial tunnel and was not treating my injury properly. The doctor gave me tailored exercises and instructions on how to heal and made me a custom splint to help my arm rest properly. To make sure your injury is getting treated with the utmost care, I highly recommend a doctor’s visit.
By regularly stretching and strengthening your wrists and arms, as well as mixing up stitches, needle sizes, and yarn weights, you are more than likely to avoid the nightmare that is an RMI. If you love knitting and can’t imagine having to put your needles down for more than a day, then I encourage you to take breaks and treat your body well so that you can keep on stitching. If you found this blog post helpful, please be sure to share it with a knitting friend! And comments any tips you have below.